Knots Every Hatteras Island Surf Angler Should Know
Posted by Frank & Fran's Crew on 6th Oct 2026
Knots Every Hatteras Island Surf Angler Should Know
The strongest gear in your tackle bag is only as good as the knot connecting it. A citation red drum can strip your reel, but if the knot at the swivel wasn’t tied right, the whole run ends the same way: a slack line, a lost fish, and a story you don’t want to tell.
Knots are the cheapest part of fishing and one of the most important. Learn a handful of dependable connections, practice them at home, and you’ll spend less time wondering whether your rig will hold when a fish takes off.
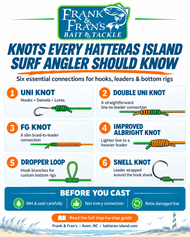
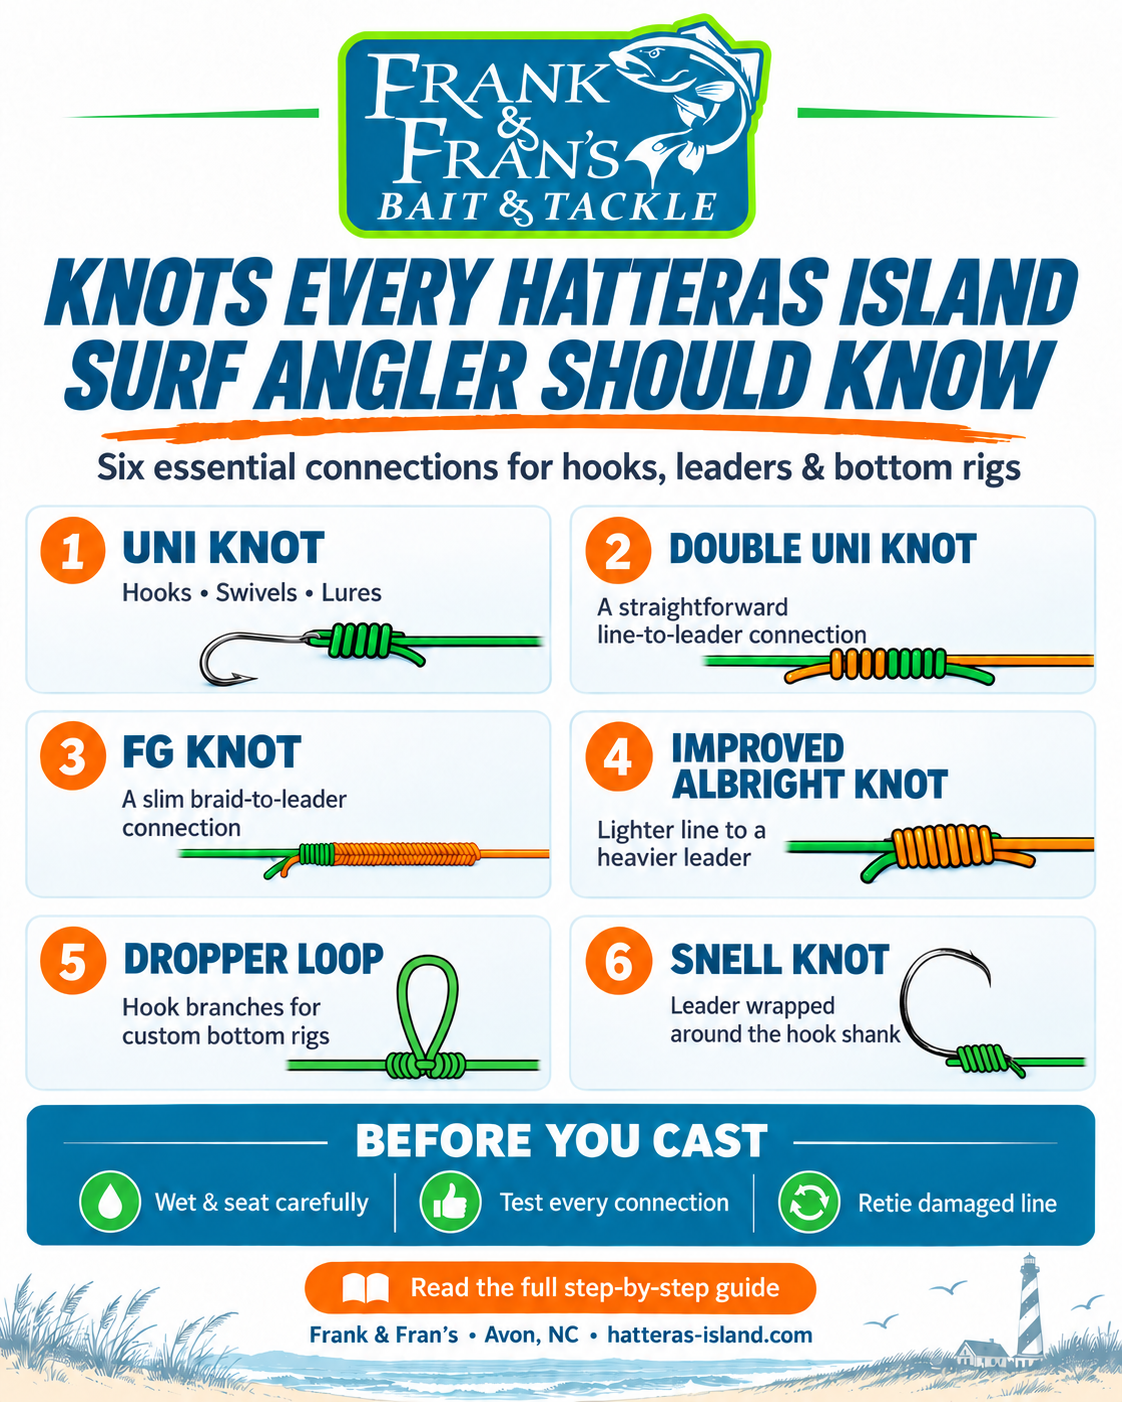
These six knots cover terminal tackle connections, braid-to-leader connections, and homemade bottom rigs for Hatteras Island surf fishing.
Why Knots Matter
Every connection in your setup is a potential failure point:
- Main line to leader
- Leader to hook or rig
- Line to snap swivel or clip
- A dropper loop for adding a hook branch
A great rod, a tuned reel, and premium line can’t make up for a poorly tied knot. Use a knot suited to the connection, cinch it carefully, and test it before you cast.
Tips Before You Start
- Wet the knot before cinching it. Water/spit helps lubricate sliding coils. With the FG, tensioning the braid wraps is also essential; moisture alone won’t seat the connection.
- Tighten steadily. Guide the coils into place instead of jerking loose strands tight. Look for crossed wraps or uneven coils.
- Test before trimming. Give the finished connection a firm, steady pull, keeping hooks safely away from your hands. If it slips or looks wrong, retie it.
- Leave a small tag. Trim excess after seating and testing, with enough margin for the line and knot you’re using. Don’t cut loose, untested tags flush. As pressure is applied to the knot, it will tighten up more.
- Check after fish and snags. Retie when you find abrasion, damaged coils, or any doubt about the connection.
- Choose leader strength for the job. Casting load, abrasion, and your target fish matter. If a connection catches in the guides, consider a slimmer knot rather than reducing necessary leader strength.
Browse our line and leader selection for monofilament, braid, and fluorocarbon options.
Knot #1: Uni Knot
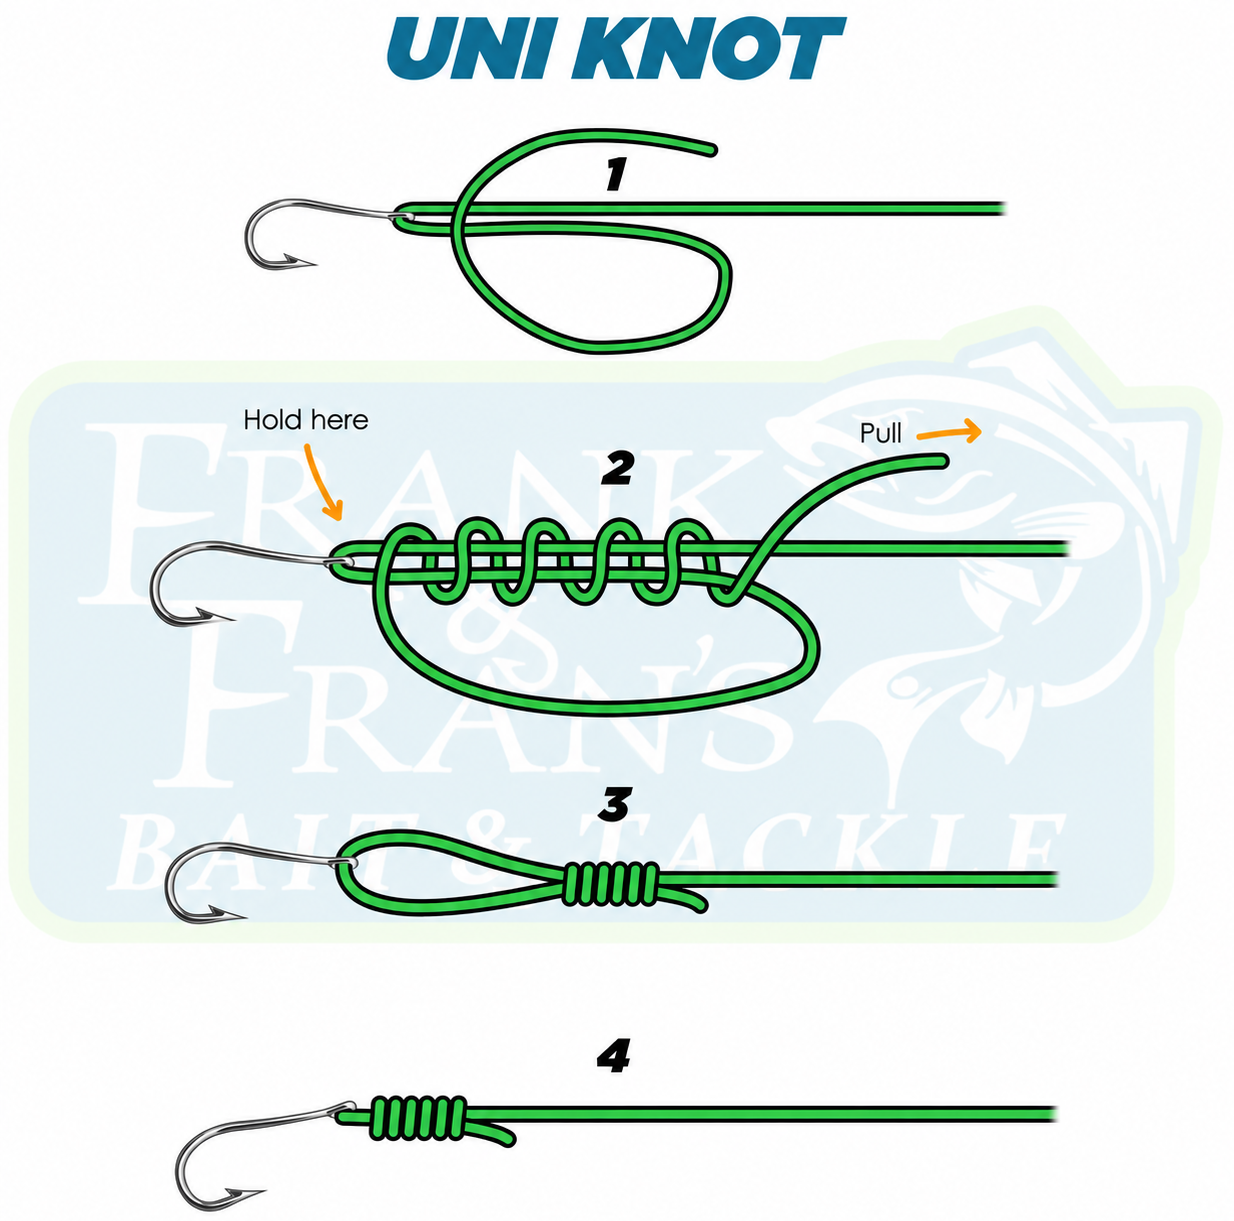
The uni is a useful everyday knot for connecting monofilament or fluorocarbon to a hook, swivel, snap, or lure. It is also great for tying line to your spool. Learn it well and you’ll have a dependable option for many terminal connections.
When to Use It
- Tying a hook to leader
- Attaching a snap or swivel
- Connecting a lure directly to line
- Tying line to reel spool
How to Tie It
- Pass the tag end through the hook or swivel eye. Leave enough line to work comfortably.
- Bring the tag back alongside the standing line, then curve it into a loop.
- Pass the tag through that loop and around both parallel strands 5 to 7 times. Every turn goes through the loop around both lines.
- Wet the coils and pull the tag steadily to gather them into a neat knot.
- Pull the standing line to slide the knot down to the eye. Seat it, test it, and trim the excess tag.
Keep the wraps orderly. The right number of turns can vary with line material and diameter.
Knot #2: Double Uni Knot
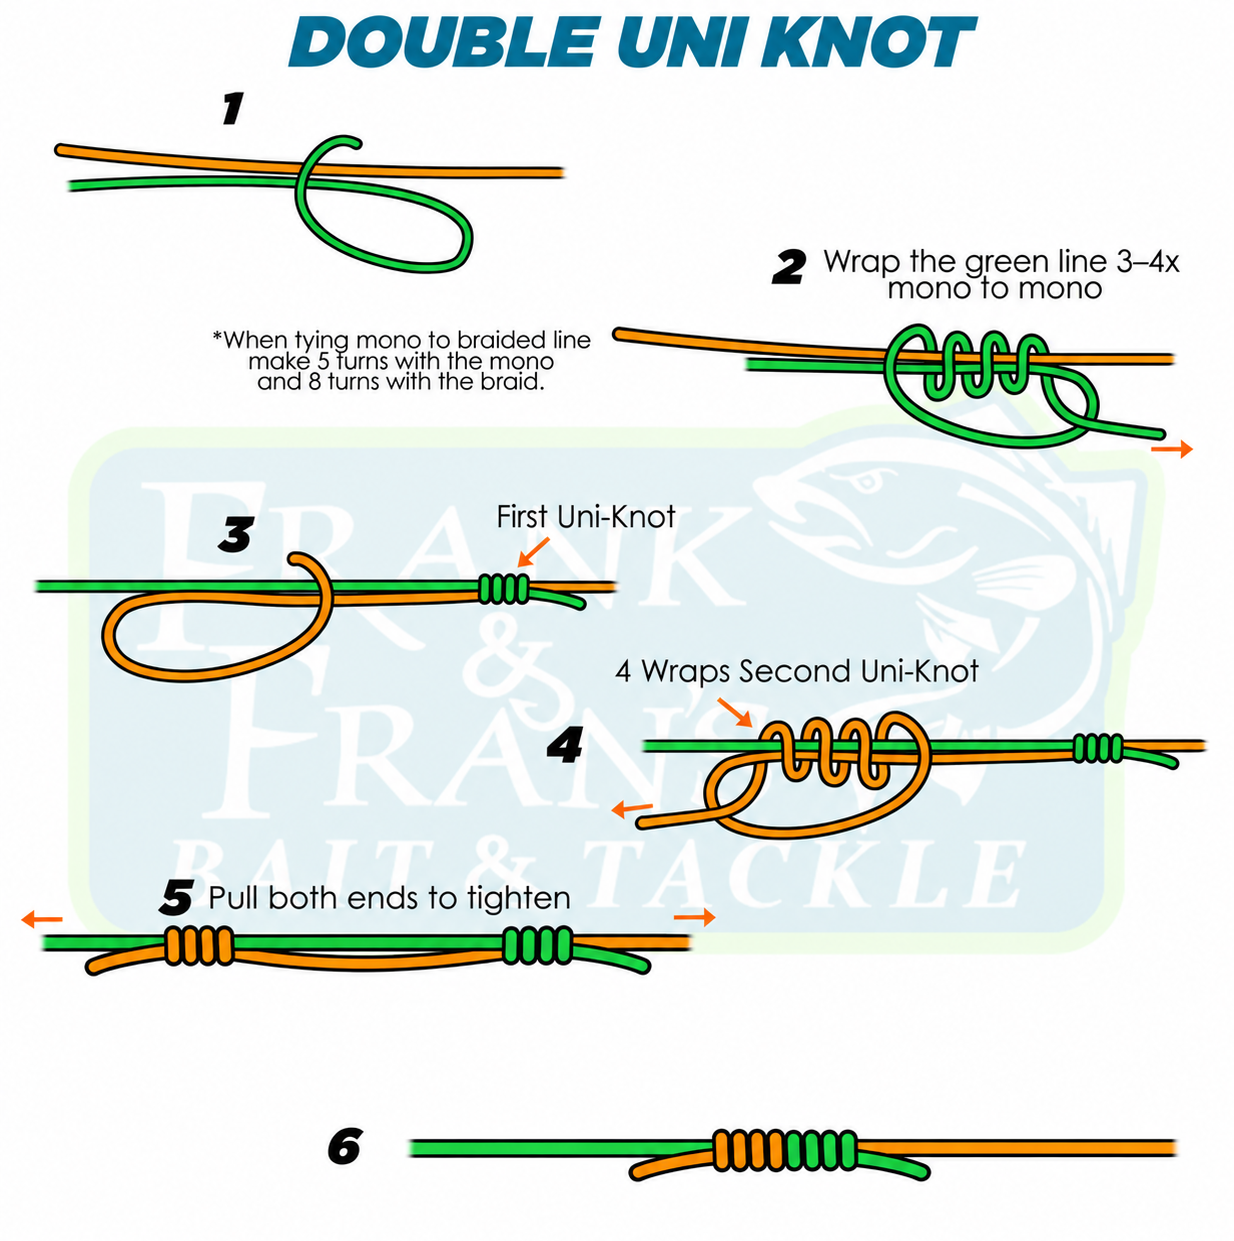
The double uni joins two lines using a uni knot on each side. It’s a practical connection to learn before tackling more involved braid-to-leader knots.
When to Use It
- Joining braid to monofilament or fluorocarbon leader
- Connecting two compatible monofilament or fluorocarbon lines
- Making a leader connection that’s straightforward to inspect and retie
How to Tie It
- Overlap the two lines by about 8 to 12 inches, leaving room for both knots.
- Make a loop with one tag. Wrap that tag around both overlapping lines and through its loop on every turn.
- Use about 5 turns for mono or fluorocarbon and 6 to 8 for braid as a starting point, adjusting for the line and diameter.
- Pull that tag to gather its coils. Repeat with the other tag, forming a second uni facing the opposite direction.
- Wet both knots. Pull the two standing lines steadily so the knots slide together.
- Seat and test the connection, then trim both tags.
This connection makes a noticeable bump. With a heavy leader that must travel through the guides, practice the FG as another option.
Knot #3: FG Knot
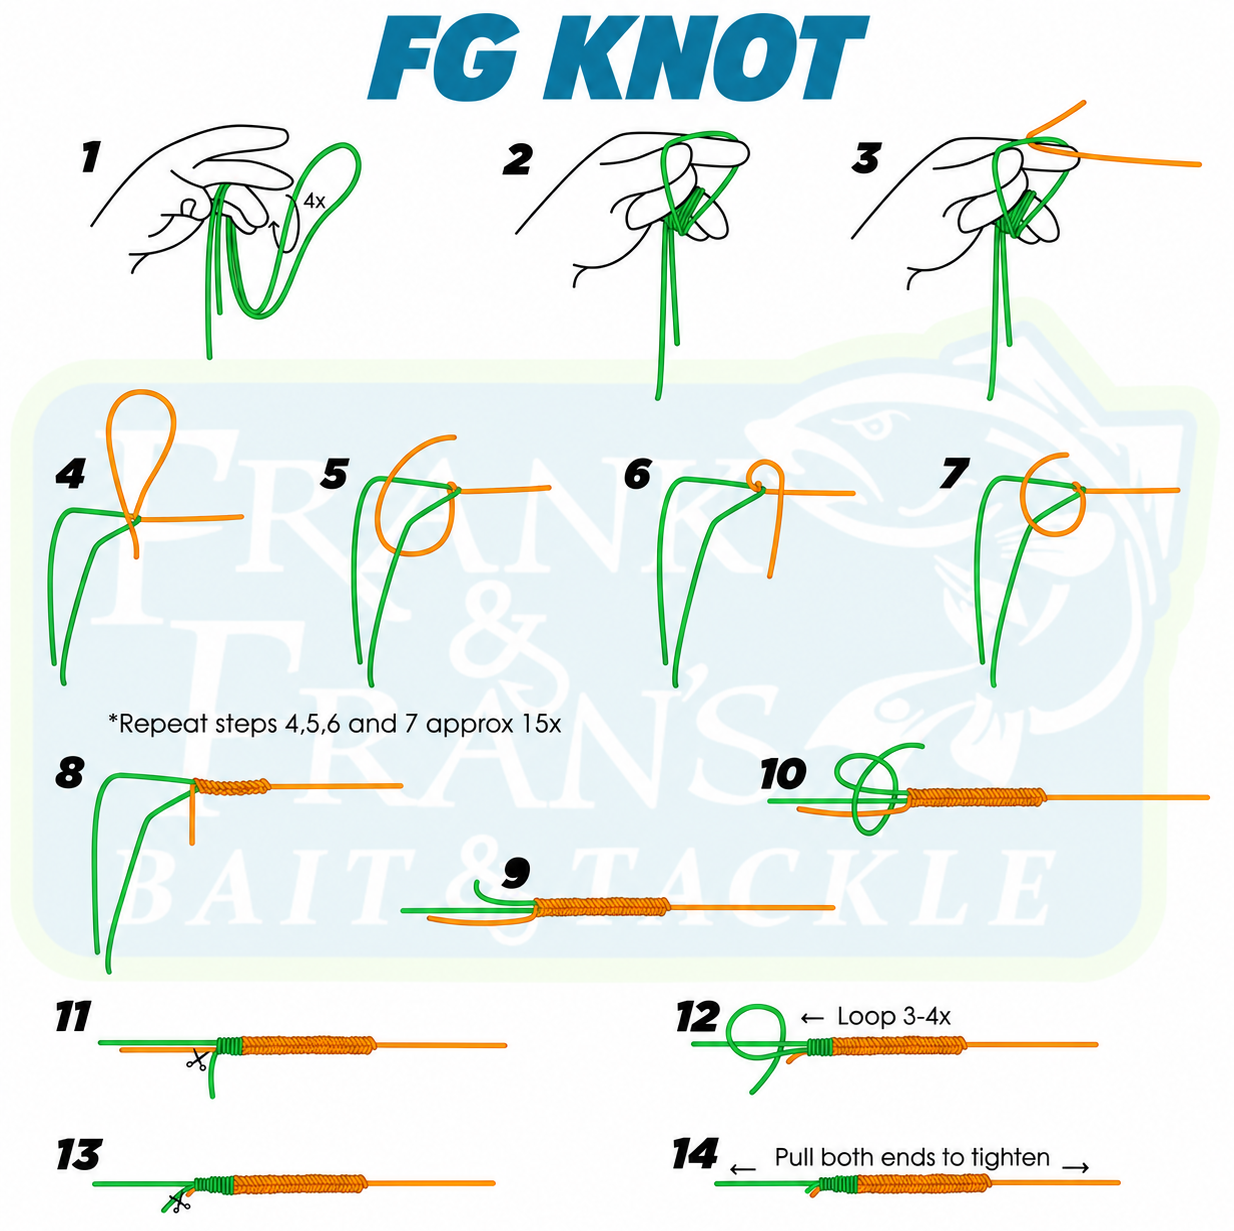
The FG connects braid to a monofilament or fluorocarbon leader with alternating braid wraps that grip the leader. Its slim profile is useful when your leader connection travels through the rod guides.
It takes more practice than the double uni. Use the diagram alongside the instructions, and learn one complete method before mixing techniques.
When to Use It
- Joining braid to mono or fluorocarbon leader
- Fishing a leader connection that passes through the guides
- Building a slim connection for repeated casting
How to Tie It
- Hold the braid under steady tension using your fingers or a knot tool. Lay the leader across it.
- Pass the leader alternately around each side of the taut braid to build a closely packed weave.
- Continue until you have a sufficient length of tight, even wraps for your line combination. Count carefully: a pair of alternating passes is two individual passes.
- Pinch the weave and tie a half hitch with the braid tag around the leader and standing braid to hold it.
- Pull the standing braid and leader firmly to seat the weave. The braid must grip without slipping.
- Add locking half hitches, trim the leader tag, then finish with half hitches around the standing braid alone. Test before trimming the braid tag.
Wrap counts and finishing sequences vary between FG methods. Follow the complete method you practice, and retie any connection whose wraps slide under load.
Knot #4: Improved Albright Knot
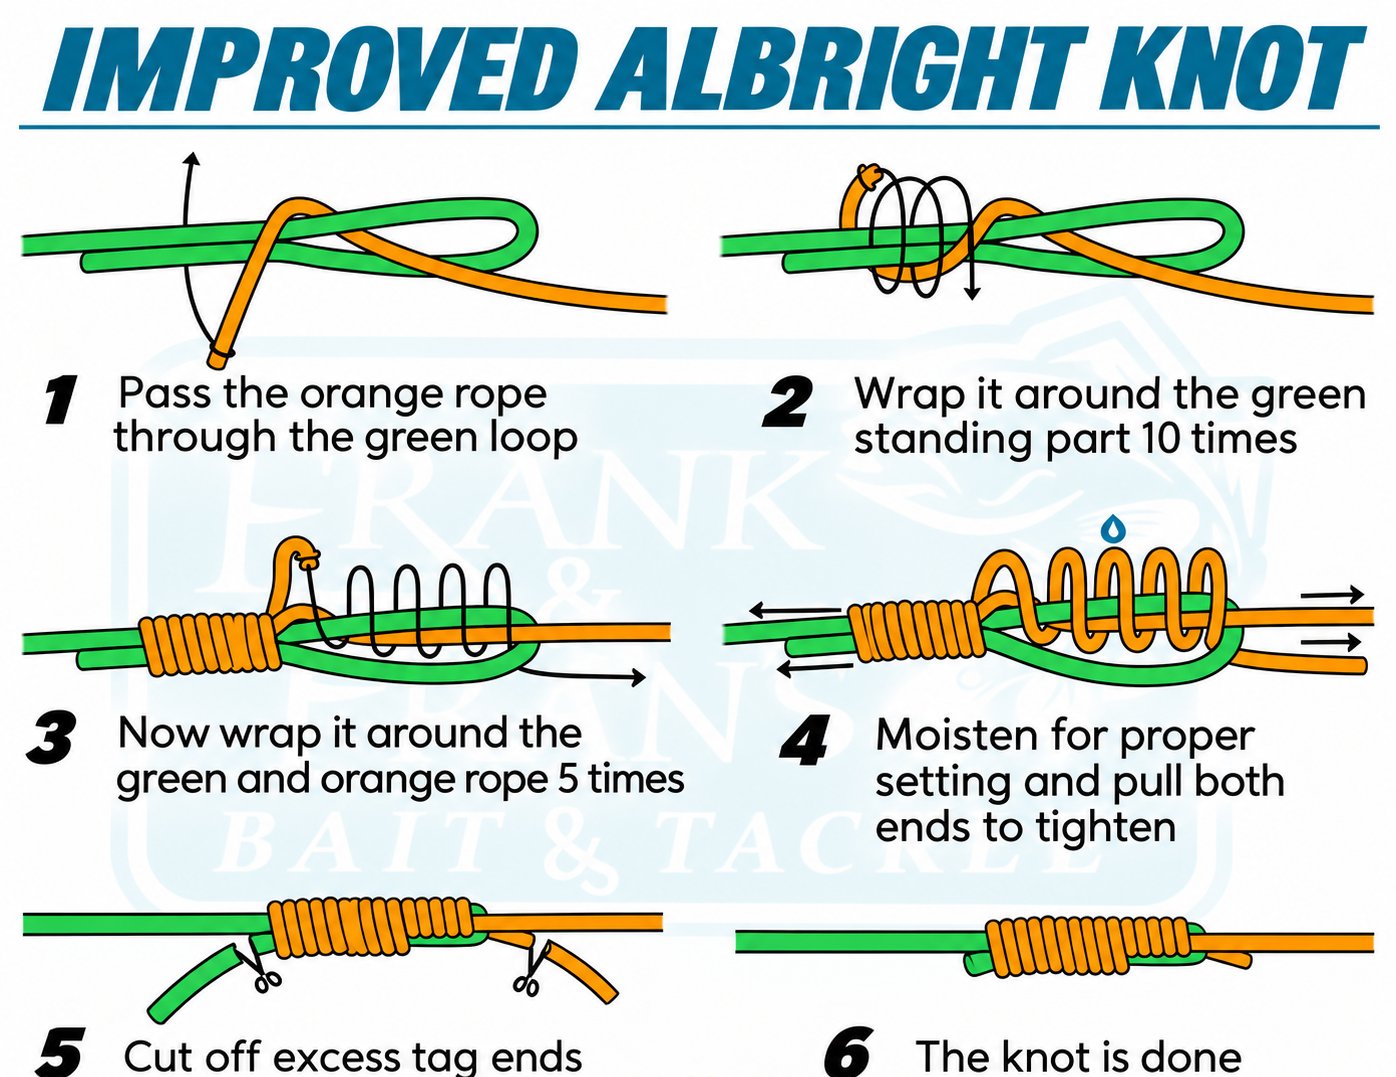
The Improved Albright joins a lighter line to a heavier leader. The version shown in our diagram uses 10 main wraps followed by 5 locking wraps. Other knots and variations sometimes share similar names, so follow this diagram’s sequence consistently.
When to Use It
- Connecting braid to monofilament or fluorocarbon leader
- Joining lines with different diameters
- Making an alternative to the double uni or FG
How to Tie It
- Fold the heavier leader back on itself to form a loop.
- Pass the lighter line through the loop, leaving a long tag.
- Wrap the lighter tag 10 times around both strands of the doubled leader, keeping the coils close and orderly.
- Make 5 additional locking wraps around one leader strand and the lighter line, following the return path shown in the diagram.
- Feed the tag through the remaining loop as illustrated. Wet the knot and snug the coils gradually, keeping the strands aligned.
- Pull the standing lines to seat the connection. Test for slipping, then trim the tags.
The locking-wrap path matters. If the coils cross, bunch up, or slide during testing, start again.
Knot #5: Dropper Loop
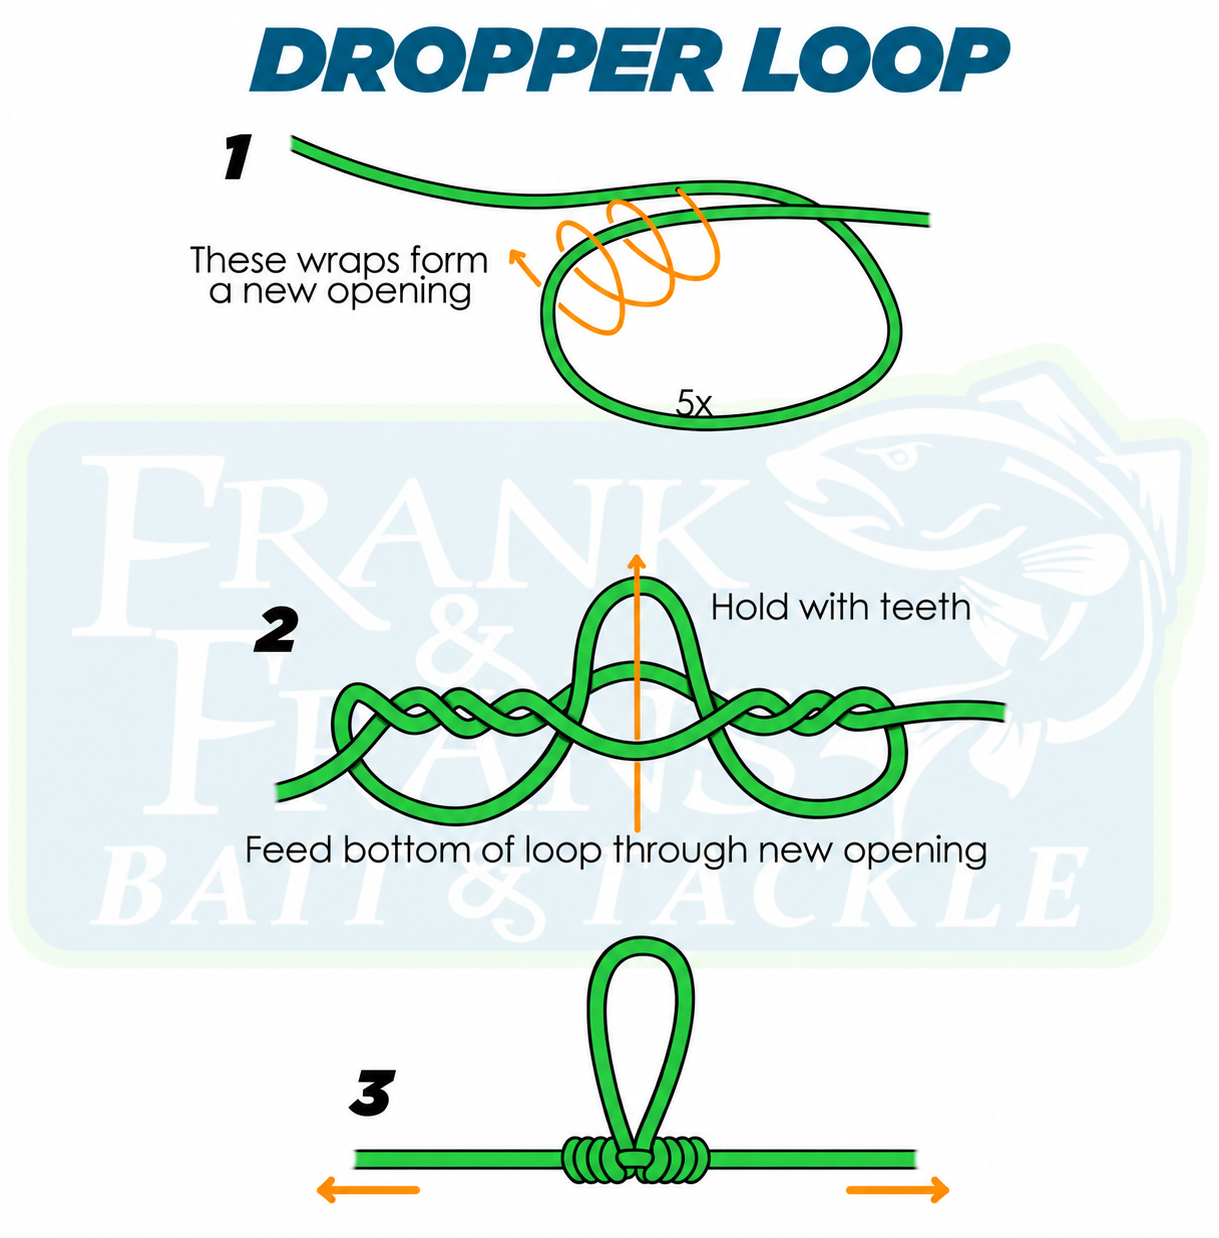
A dropper loop creates a branch in your leader for attaching a hook. It’s a useful skill for making custom double-drop bottom rigs.
When to Use It
- Building your own bottom rigs
- Adding a hook branch along a leader
- Adjusting hook spacing for a specific rig
How to Tie It
- Form a loop where you want the dropper branch.
- Wrap one side of the loop around the other 5 to 7 times, keeping a small opening in the middle of the twists.
- Push the opposite portion of the original loop through that center opening. This bight becomes the dropper.
- Hold the emerging loop with your fingers or a knot tool. Wet the knot.
- Pull both standing ends steadily and evenly until the coils seat around the base of the dropper loop.
- Test the finished knot and check that the branch projects from the main leader.
For a loop attachment, pass the dropper through the hook eye, then pass the entire hook through the loop and snug the hitch.
Prefer a ready-made setup? Browse our surf fishing rigs.
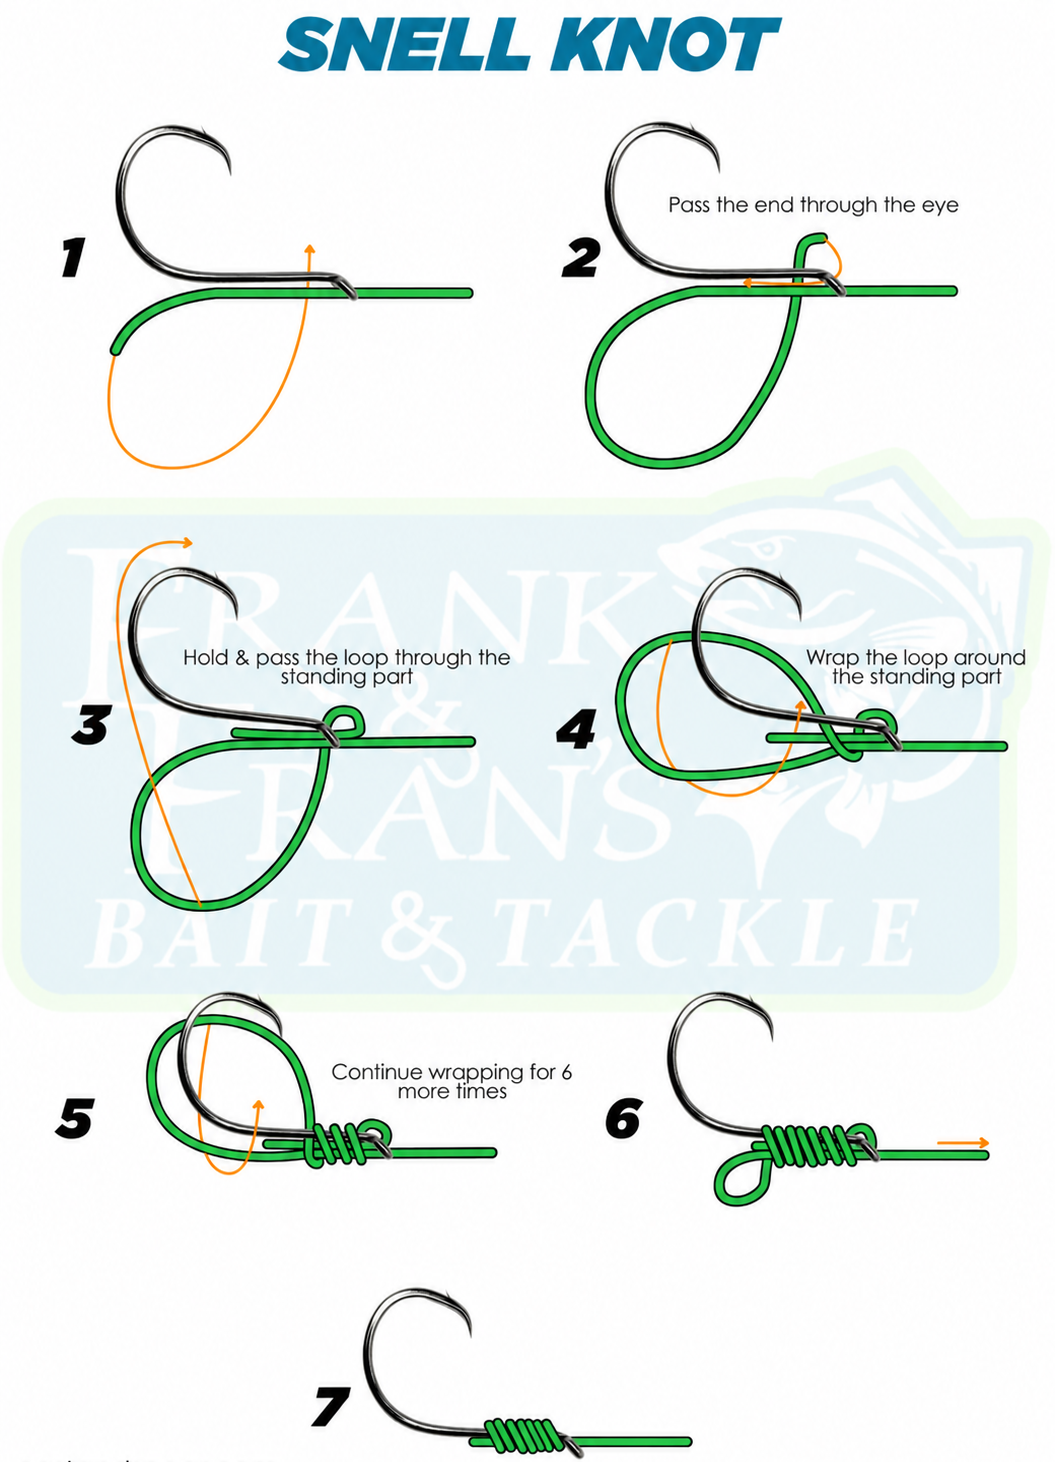
Knot #6: Snell Knot
A snell secures the leader around the hook shank. Line still passes through the eye, but the wraps around the shank form the connection. The method below uses the loop-wrap approach shown in our diagram.
When to Use It
- Connecting a suitable circle hook to a leader
- Building drum rigs
- Making a connection that pulls along the hook shank
How to Tie It
- Pass the leader tag through the hook eye, leaving enough line for the wraps.
- Pass the tag through the eye again in the same direction, forming a large loop alongside the shank.
- Hold the line near the eye. Wrap the loop around the hook shank and the line lying against it, working toward the bend.
- Make about 7 to 8 neat turns, keeping the coils together.
- Wet the wraps and pull the standing leader to shrink the loop and gather the coils. Pull the tag and standing line as needed to seat the knot securely.
- Test the connection and trim the excess tag.
Check the hook manufacturer’s recommended line direction, especially with circle hooks and angled eyes. When fishing a circle hook, let steady pressure bring the hook into position—reel down and load the rod instead of making a sharp hook set.
Our F&F Circle Hook Drum Slider Rig is a ready-made option when you want to spend more time fishing and less time assembling rigs.
Quick Reference: Which Knot for Which Job?
| Connection or task | Knot to practice |
|---|---|
| Leader to reel, hook, swivel, snap, or lure | Uni |
| A straightforward line-to-leader connection | Double Uni |
| A slim braid-to-leader connection through the guides | FG |
| Lighter line to a heavier leader | Improved Albright |
| Hook branches on a custom bottom rig | Dropper Loop |
| Leader wrapped around a suitable hook shank | Snell |
Knot performance depends on the line, diameter, tying method, and how well the knot is seated. A fixed strength percentage won’t tell you whether the connection you just tied is ready to fish. Inspect it and test it.
Practice at Home
Every knot in this guide is easier at your kitchen table than in the wind at Cape Point with cold fingers and a fish rolling in the surf.
Start with inexpensive monofilament while you learn the movements. Then practice with the actual line, leader, and hooks you plan to fish. Aim for at least 20 careful repetitions of each knot, focusing on consistency before speed.
- Practice with different line diameters.
- Try tying in lower light once you understand the sequence.
- Inspect your coils before tightening.
- Test every finished connection with steady pressure.
- Retie any knot that slips, crosses awkwardly, or leaves you uncertain.
The goal is a connection you can tie reliably when conditions on the beach make everything harder.
Stop In for Fresh Line and Terminal Tackle
Frank & Fran’s has been outfitting Hatteras Island anglers since 1988. Whether you need fresh mono for spooling, a shock leader for drum, or hooks and swivels for your next rig, stop in the Avon shop to get your setup ready.
Browse our full surf fishing tackle selection online to stock up before your trip.
The knot is the connection between you and the fish. Take the time to tie it well. See you on the sand!